Thursday, November 30, 2006

Does Plaid Make Me Look Phat?

I haven't posted anything for a long time, so I thought I would at least throw something up on the blog. In my opinion, the coolest automobile seat covering material has to be plaid wool. I owned a 1975 Porsche 914 with red plaid seats. The new VW GTI can be ordered with plaid seats. But the best plaid seats have to be those found in Porsche 911s in the 1970s. Here are a few photos I have grabbed from around the interweb:


Well, those are only Britax child seats in the back of a Porsche 912. Good looking race car driver, though. Is that Paul Newman?

Sunday, October 08, 2006

Getting my fix


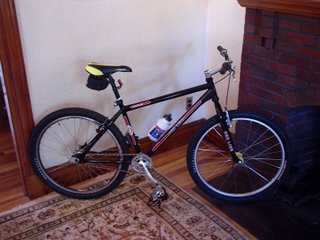
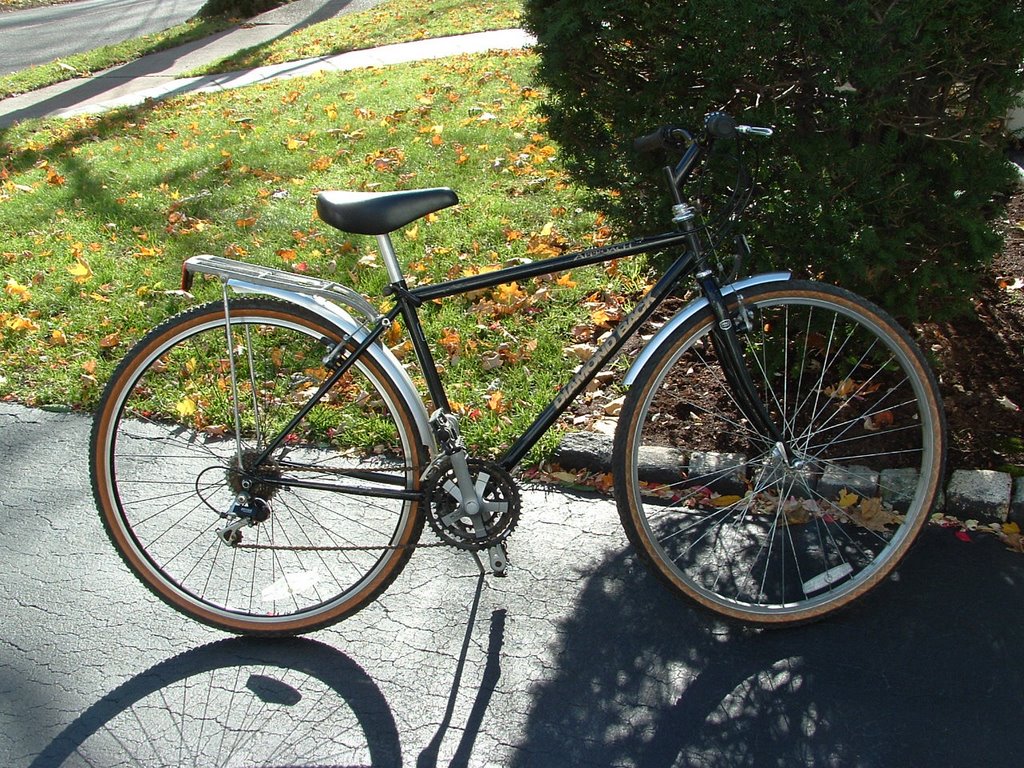
About a year ago, I bought a bare bicycle frame on craigslist. It is a Redline Monocog, a bike that was intended to be a single-speed mountain bike. This particular frame is cool because it is made of steel (some Monocogs are made from aluminum) and because the Redline letters on the frame look like a Boston Red Sox font. I built the frame up with road bike wheels, the rear having a Sachs Duomatic hub. I commuted on this for some of the winter, and it was really cool. But since then it has sat in our basement collecting dust.

A few weeks ago, I woke up in the middle of the night with the idea that it would be very cool to build this bike up as a mountain bike, and in particular as a fixed-gear mountain bike. When I get an idea in the middle of the night, I have to work on it. So I began collecting parts at local used bike stores and on eBay. Here are some of the parts:

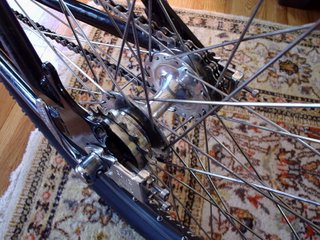
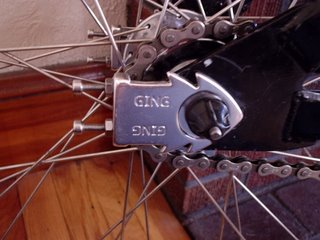
Rear Wheel: I had a flip-flop rear road wheel I bought at Simple Living Bicycles in Framingham, Massachusetts. It was a 700c rim with a Suzue hub. Because the rim was too large for a mountain bike, I took the wheel apart by unscrewing all of the spokes nipples and removing the spokes. I bought a new (old) 26" rim at Bikes Not Bombs. It and the hub have 36 holes. I calculated the apprpriate spoke size using Spocalc, bought spokes, and built up the wheel. I use Sheldon Brown's wheelbuilding instructions when I build wheels. I ended up putting on an 18-tooth cog on the fixed side and a 16-tooth freewheel on the other side.

Front wheel: I had a 28-hole BMX hub that I had bought on eBay a few months previous. I bought a 28-hole mountain bike rim on eBay. I had hopes of building it up with a radial spoke pattern, but was a little afraid about breaking the hubs. The concern was mooted when I found that my local bike store only had spoke lengths that would allow me to build the wheel with a 3-cross spoke pattern. So that's what I did.


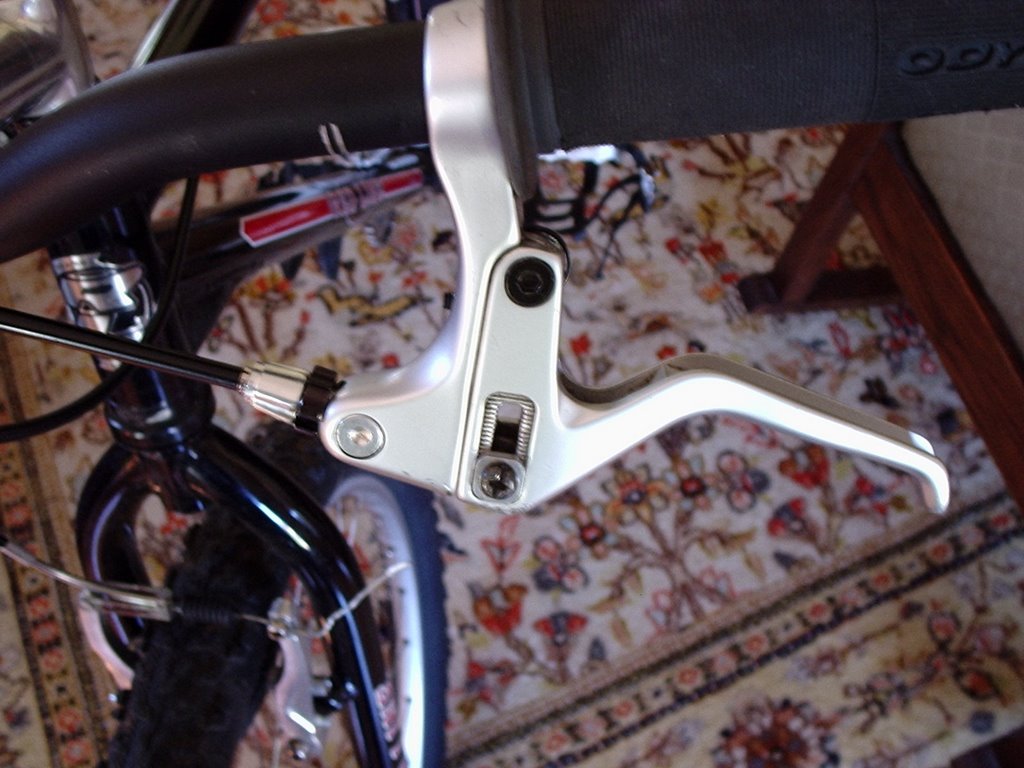
Cockpit: I had a stem, handlebar, and levers I bought from a kid who does freeride mountain biking. The front lever is an adjustable brake lever that can work with either v-brakes or cantilever brakes, and the rear lever is for cantilever brakes only.


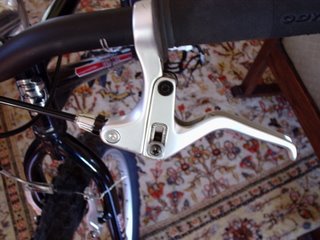
Brakes: I have a box of miscellaneous parts from previous bike projects. I had a set of front v-brakes and rear cantilevers. I attached these to the frame. There was no rear cantilever cables stay on the frame, so I got (at Broadway Bicycle School) the kind that mounts via the seatpost pinch bolt. I cut brake cables and housing to fit using my Dremel cutoff wheel.


Tires: Craigslist bargain Bontrager Jones XR.

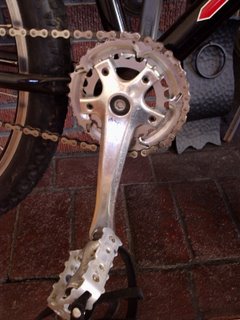
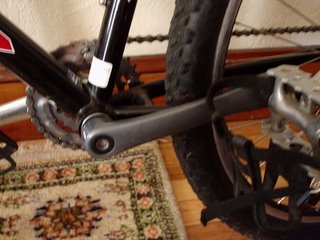
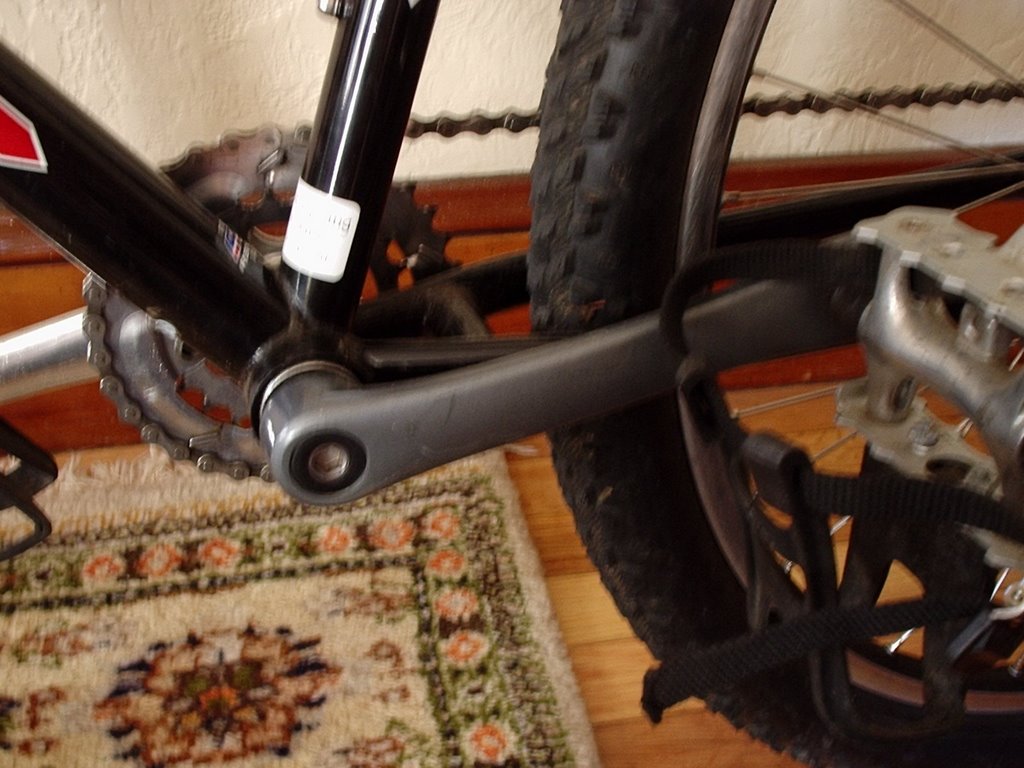
Crankset: Chainring side is a Sugino MTB crank with a 170mm crankarm. I took off the large and small chainrings and left the middle one, which has 34 teeth. I subsequently had to use the granny gear as a spacer to get the chainline right. I was looking for a 32-tooth chainring because I have a 16-tooth rear cog and most people seem to like a 2:1 ratio on fixed gear mountain bikes. But 34 was the best I could do. For the left side, I didn't have a crankarm to match the right side, but I found another 170mm crank in my pile of old parts. They don't match, but they are the same size and work just fine.


Rear Axle: The Suzue track hub had a solid rear axle, but I wanted to make it quick release so that I could easily flop the wheel over when I want to switch between the the fixed 18-tooth cog and the free 16-tooth freewheel. Track and wanna-be messenger types like to have solid axles because they are strong and because they deter casual bike wheel thieves. But my bike won't be outside unless I am sitting on it. And if you want to flip over the wheel on one of these, you have to carry a wrench with you. So I took a hollow axle from an old rear road wheel, and cut it down to size with the Dremel cutoff wheel. Its bearing cones fit the Suzue bearings. I also cut down a quick release skewer and tapped more threads on it using a 8.5 x 5 metric tap. I had some cheapo chain tensioners that were made for a bike with thicker axles, so I cut them down to fit my axles.


I went out for a ride with my friends on Saturday. They were quite skeptical about the bike and thought that they would be waiting for me a lot. We have a reasonably technical ride route, with some pretty nasty nasty descents, climbs, and lots of undulating terrain with roots and loose rocks. The bike was AWESOME! It was a blast to ride. I kept up with everyone, and found myself right on the tail of the fastest guy a number of times. Because I commute to work every day on a fixed gear, it wasn't too difficult to transition to this on dirt. It is a little odd to have to pedal over jumps and big obstacles. I did feel like I had more control on loose stuff and on steep descents. And on big ascents, I had to think ahead and get up some speed at the bottom of the hill. That's probably the right way to attack ascents, anyway.

All in all, I am very happy about this bike build. It is awesome.

Monday, September 18, 2006

The Black Boxes are Missing

In a post below, you saw the built-in cabinets I built in our sunroom. The shelves are only 10.5 inches deep to preserve space in a narrow room. As a result, what Becca refers to as our Black Boxes (DVD player, TiVo, xBox) stick out and look really bad in the room. See below.


The wires hanging down are ugly, and the boxes are ugly, too. The wire problem can be solved with a cord tube (some thing like this from Amazon), but the black box problem is more intractible. To make matters worse, I bought a Sony 400-Disc DVD player from a friend a few weeks ago, with the thought of organizing all of our DVDs in the player. Our kids scratch our DVDs up, and they are only getting worse. (Parenthetically, the player turns out to be AWESOME--you can enter DVD information by plugging a PC keyboard into it, and it holds 400 DVDs. The player is a bit sensitive to scratches on DVDs. I got a disc repair machine to fix them, and it has worked great). The main downside of the DVD player is that it is BIG (it's not seen in the photo above), and it pushed the whole black box issue over the edge for us. On the other hand, it has freed up a ton of space on shelves we had devoted to DVD storage.

I have thought for a while that it would be cool to put all of our black boxes in the basement of our house, with the TV being the only visible audivisual component in the house. I imagined that all I really needed to do this would be longer cables and cords, a hole in the floor, and something to transmit the remote control signal down to the black boxes in the basement. Radio Shack sells a wireless remote extender that takes signals from a little box by the TV and sends them to somewhere else in your house wirelessly. I bought this, and it works like a charm. I built a little table in the basement for the black boxes to sit on, routed the cables up through the wall, and placed the little IR repeaters under the TV and on the black box table.

The only part of the project that isn't complete is wiring the surround sound from the surround sound receiver in the basement up to speakers in the room. But there is enough room to do this, and I am waiting to find a good deal on a Bose system on eBay or Craigslist. Here is my powerpoint diagram of what the system sort of looks like. Those black things on the floor by the chairs are the speakers. I hope to find some small white ones that are not that conspicuous.

Thursday, September 14, 2006

The Big Scare

Long story short, when I was accelerating hard two days ago I heard a lound bang followed by ominous sounds. I had the car towed back to my house and basically went into a funk for a day or two while I pondered worst-case scanarios. A really nice rebuild of one of these engines can cost $20,000. I can't get behind that. There was nothing obviously wrong that I could see by looking under the car or under the hood. It turns out is was a spark plug that had flown out. It was cylinder 3, the farthest forward on the driver's side. I tried to very carefully and gingerly start it back in its threads, but it got about two turns on it and I ran into enough resistance that I was afraid to proceed. Looking at the spark plug itself, there were no burnt threads or other obvious signs of damage.

As I saw it, I had four alternatives:

1) force the plug in and hope to get through the bad threads and find the real threads (seems like a bad idea).

2) attempt to chase the existing threads with a tap

3) try to do a timesert with engine in car. Not sure if this is possible.

4) drop motor and do it right with a timesert. I am hoping NOT to do this because my workspace location is not ideal and frankly I really hate dropping motors.

Speaking of workspaces, it was raining outside tonight when I did this. So I pulled Becca's Honda back to the car and used the hatchback as a tent. Man, I need a garage. Like really need.


I consulted the Porsche message boards at Pelican Parts, and someone suggested buying a special tap that is made for just this purpose. It is called a Back-Tap, manufactured by KD Tools.

The new tool worked. I decided to remove the valve cover, and it gave me enough clearance to get the tool in. The first photo is of the scene of the crime. I have removed heater hoses, spark plug wires, and valve cover. It's a little dirty down in there.


Here is the tool. I coated it with my favorite bearing grease to catch chips. This is bicycle bearing grease from Phil Woods.


Here I have inserted the tool in the spark plug hole. It took a bit of searching. The piston, by happy coincidence, was nowhere near the top of the cylinder. The tool was able to sink in all the way until its shoulder seated. Here I am using my wife's makeup mirror, and you can see the tool sticking out.


It was quite difficult to get the tool engaged--you have to twist the knob while holding the tool still. Doing this in the close confines of the engine compartment is not easy. I was juuuust able to do it one-handed, but then figured out how to get two arms in there. I then gingerly tried to back the tap into the threads. It wasn't easy--I kept referring to the mirror to make sure the tool was centered in the spark plug well. Finally, I got about a full turn on it but then ran into too much resistance to continue by hand. I stewed about the decision of whether to put the ratchet on it and apply more force. Finally after checking and rechecking that it was centered, I did it. It resisted a bit, but not so much as to cause me to worry. I backed it out slowly and---voila. The tap was covered with aluminum chips:


I started the spark plug back in the hole without any further cleaning or messing around. I figured that I could cause more trouble than I would fix by blowing compressed air, etc. I put a very light amount of torque on the plug, wimping out when I got it just barely tight. Probably like 5 or 10 ft-lbs. I bolted everything all back together, checked the other plugs, put the hoses back on, and....

And then I got in and turned it. It fired right up, no loud noises. It sounded awesome, nice and raspy just like it should. Even though it was stone cold, I revved it quickly, blipping it a few times to 5000 RPM or so. My thought was that this would help blow crud out of the cylinder if I had inadvertently dropped stuff in there. I am really happy about this. I will be adjusting valves this weekend or next weekend, so I will have another chance to check torque on the plug.

I am not endorsing Amazon, but you can buy the tool from them at the link below. I get a cut if you do, but I am including it mostly so that there is no ambiguity about what it is:


New wheels on the way

One of the things I don't like about the Porsche is that it is fitted with BBS wheels. BBS wheels are very high quality wheels--they are manufactured in Germany and are approved by the TUV. But they look a little too "Miami Vice" for me. The proper original equipment wheels for this car, on the other hand, look exactly right to my eye. They are the famously strong forged Fuchs wheels (say that three times fast). These were manufactured in a way that placed performance and durability over cost. So I shopped around online for a while and found some being advertised on the PCA website. They come with Pirelli P7 tires. Here is a photo. I am excited to get them on the car to see how it looks and drives.

Thursday, August 31, 2006

Oops, I did it again...


I sold my van (see the airspeed indicator below) and bought a 1980 Porsche 911SC Targa. This is my fourth Porsche. I feel a little sheepish driving this car around because it looks pretty nice. There is a lot of cultural baggage associated with Porsches. I just like its engineering and the way it drives. I would be happy if people thought it was a VW bug. I got a good deal--it is in pretty nice shape. There are a few little projects I need to do, and I'll post them here. The first project I did (unfortunately not documented) was to fix a broken trip odometer. I pulled the speedometer out of the dash and took it apart. I had to superglue a gear's support back into place. It works great now. More to come.

Thursday, August 10, 2006

SpaceShipOne

I took a road trip with three of my very good buddies to witness the first space flight of Burt Rutan's SpaceShipOne. We stayed in an a Motel 6 in Mojave next to the railroad tracks. The morning of the flight, we arrived at the airfield around 4:00 AM to find it packed with every nerd that lived within a 1000-mile radius. So we fit right in. The flight was successful and spectacular. I took these photos with a Pentax ME Super with a big zoom on it. The photos are scanned, so they are of lower quality than we might like.

This is the space vehicle with its mothership climbing to launch altitude:

This is moments after the space ship's rocket was ignited and it is heading towards vertical. It took off nearly directly into the sun from our vantage point:

Here the space ship continues to climb. The plume from the rocket was a bit twisty as a result of maneuvering by the pilot:

More climbing:

This is first sight of the craft as it came down. It is gliding:

After the craft slowed enough, it was escorted by two chase planes, a Beech Starship and a small aerobatic plane:

More escorting:

The aerobatic plane popped some smoke in celebration of the successful flight:

Tuesday, August 08, 2006

My Rental Car

This is the way I park when I am in Milan:


This is the way I roll when I am driving over the Simplon Pass in Switzerland:


Mit Kompressor, ja?

Strongbad Birthday Cake


Becca made this cake for our friend Jeff's birthday. It is a French recipe from our French friend Marie-Laure. Would that make it a freedom cake? There is basically nothing but eggs and chocolate in the cake. Preferably Scharffenberger chocolate.

It fell to me to decorate the cake. I decided to do a monochrome rendering of Strongbad in powdered sugar. I made two templates for the cake. I placed the first one over the cake and did the lightly powdered areas with a flour sifter. Then I placed the other template over the cake (being careful not to disturb the first layer of sugar) and did a heavier coating. It turned out pretty well.

Monday, August 07, 2006

Bike #2, Diamondback Approach Hybrid Fixed Gear

After I commuted on my Van Dessel Superfly for a while, I decided to try something new. My good friend Dave had recently converted his Miyata road bike to run with a fixed gear. Dave is a serious cyclist, and he really liked riding his Miyata to work. I decided to find a bike to convert to fixed gear.

Fixed gear bicycles have only one gear and no freewheel, which means the rider cannot coast, but rather must pedal while the bike is moving. There is a fixed relationship between rear wheel speed and crank speed.

I really liked the idea of converting a "hybrid" bike rather than a dedicated road bike or mountain bike. I reasoned that the hybrid's geometry would be a little more relaxed and that it might be better for potholes and frost heaves. So I searched around and found a Diamondback Approach hybrid on Craigslist. It was very reasonably priced and seemed to have spent most of its life in a garage.


When I got it home (the punk kid who was selling it for his mom lived only two blocks from my house) I stripped off most of the components. I purchased a bargain-basement flip-flop rear wheel along with a new front wheel. The Diamondback came with 700c wheels, but I the new wheels were 27" wheels. The diameter difference is negligible, so the existing cantilever brakes worked with only minor adjustments.

I put a nice Sugino crank on the bike. It was one I recovered from another Craigslist purchase, a small Bianchi road bike. Its smaller chain ring had 42 teeth, which in concert with the 16-tooth cog on the rear wheel gives an ideal ratio for my commute. One of my main challenges was getting the chainline right. I resorted to deforming the right chainstay on the bike to accomodate the chainring. I bashed it with a ball peen hammer until it gave enough clearance. I am not too worried about weakening the frame because it is steel.


I put the stem from the Bianchi on the bike, along with the aluminum seatpost and the seat from the Van Dessel. I also put the brake levers on the flipped and cut down handlebars. These bars look a little goofy, but they are extremely comfortable. They provide about the same hand position as a modern STI shifting system, but there are no drops in the bars. I don't use those anyway. Also, the exposed cables make the bike look kind of old school. Adding fenders makes a huge difference when it is raining or when there are puddles.

After I built up the bike and was satisfied with it, I commuted for a few weeks on it. I liked it so much that I decided to fully make it my own by painting it. I stripped everything off of the bike, down to the headset bearing cups. I sanded and painted it with a spray can. I did a few coats of reflective "license plate" paint, followed by clear coat. I also masked a few snowflakes into the paintjob.


This bike rocks. If I ever build a frame of my own, I will probably try to replicate the geometry on this bike. It is really great. I am constantly on the lookout for a duplicate, identical bike.

Friday, August 04, 2006

Breakfast Nook Table

I built a table, or rather, I built a tabletop to fit in our breakfast nook. When we moved into our house, the breakfast nook had some really ugly formica stuff from the 1970s. And this was not hip 1970s stuff. It was nasty 1970s stuff.


So I bought a cherry dining table on craigslist.org. The tabletop was oval originally. I cut the table to the right dimensions to fit the breakfast nook (complete with benches advertised as having accomodated Woodrow Wilson's intelligent butt at some point in their history). We painted the table white to match the benches and trim in the kitchen.


I then screwed cement board underlayment to the top of the table and trimmed the edge with oak and polyurethaned the oak. The oak was cut using a mitre box and a hand saw. I tiled the top of the table with bathroom tile, then used flexible grout around the edges between the tile and oak trim. Apparently the oak expands and contracts, and this will cause cracks in normal grout over time. Bacteria can then hang out in the cracks. I grouted the rest of the table normally. It has served us well for nearly a year.

My Automobile Airspeed Indicator

Sometimes I wonder what is the airspeed of my van. You might think this is not that important. You might be right about that. But I DO drive a van (a Volkswagen Vanagon) with the aerodynamics of a barn door. So the airspeed affects my car more than it does most cars. And I think it is cool.


So I took apart a pager and removed the tiny electric motor that makes it vibrate. I pried off the weight that actually causes vibration to happen. Then I made a tiny propellor from a model airplane's propeller and some clear plastic. I made a mount for the motor from a small piece of plastic, and then I JBWelded the bracket to a clamp I made on my lathe. This bracket fastens to the Vanagon's antenna, which is right at the front of the van where it can catch a nice, steady stream of oncoming air. The coup-de-grace is the wiring for the motor. I had to drill through the motor mount to get a wire into reliable contact with the motor's case. The other wire is soldered to a screw that contacts the back of the motor.


I led the wires from the antenna through the driver's side wing vent window. From there, I alligator-clipped them to my voltage meter. I can watch the voltage go up on the voltmeter as the van's speed increases and the little generator catches air. It doesn't register much below 15 mph, and I imagine that it would fly apart above 80 or 90 mph. But the van doesn't go much faster than 80 mph.

Thursday, August 03, 2006

Our Built-In Shelves

Here are the problems that led us to build built-in bookshelves in our sunroom:

1) Our bookshelves were yucky old particle board shelves from IKEA.
2) We have lots of books.
3) We watch TV, and our TV took up a large amount of space in our small sunroom in our small house.
4) Professionally-built built-ins are expensive. Like, old Porsche expensive. I can't get behind that.

I started researching doing a built-in project myself. I looked at a lot of books, and Becca and I went through a lot iterations on the plans we drew up on a large piece of drafting paper. 
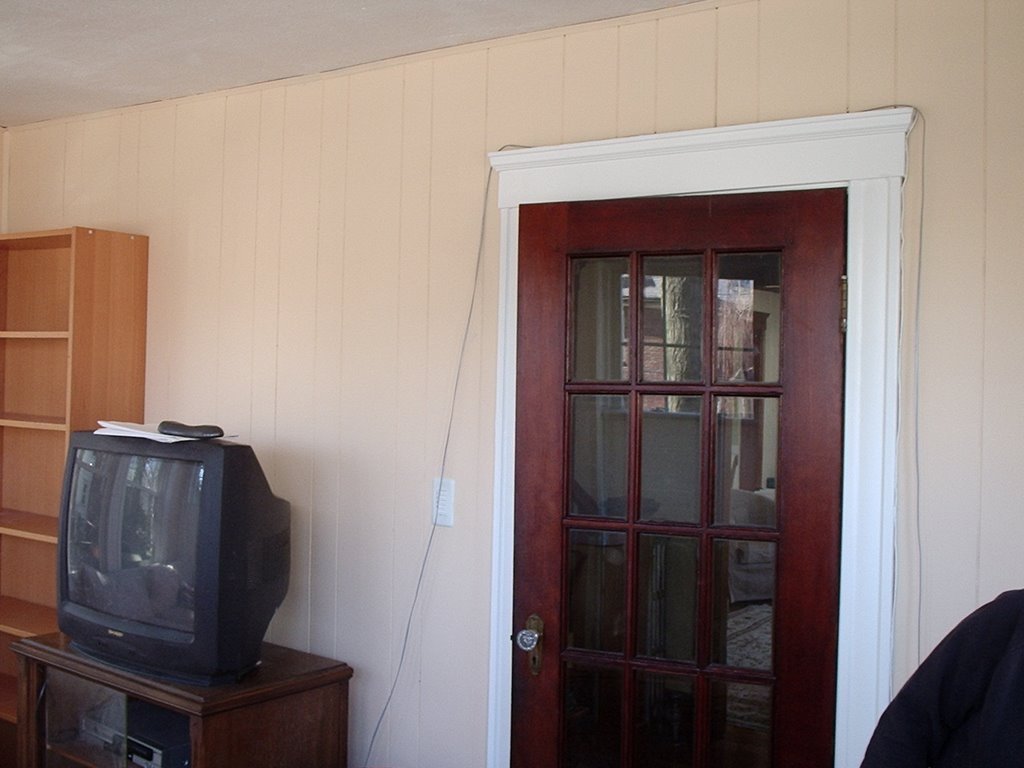
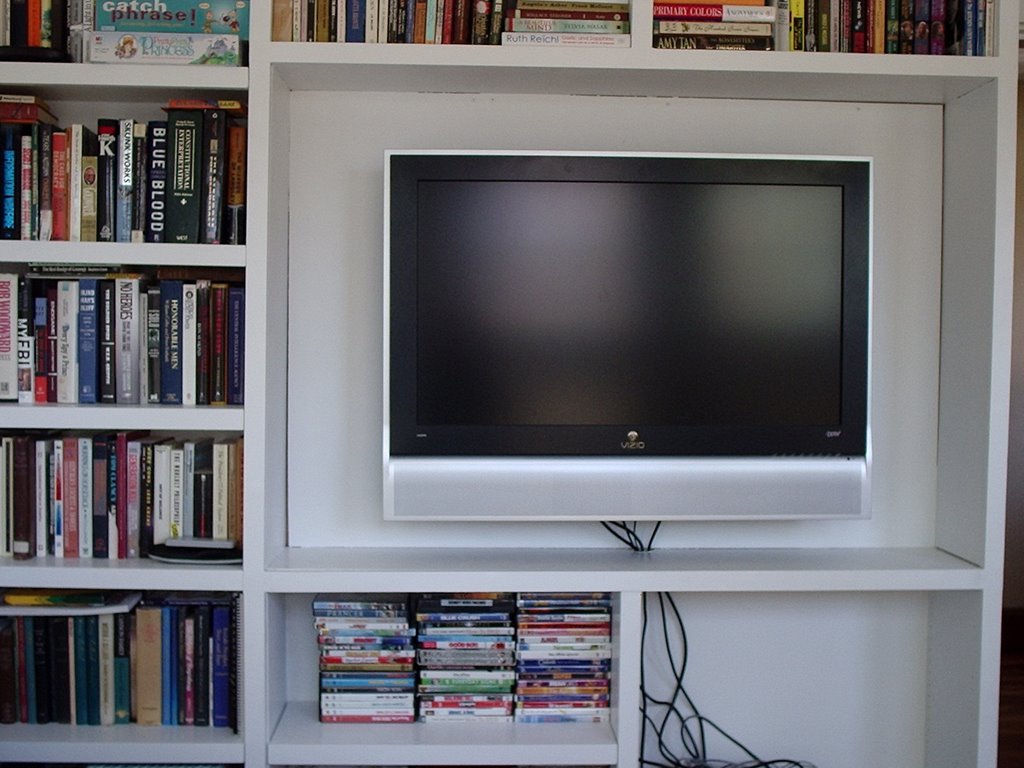
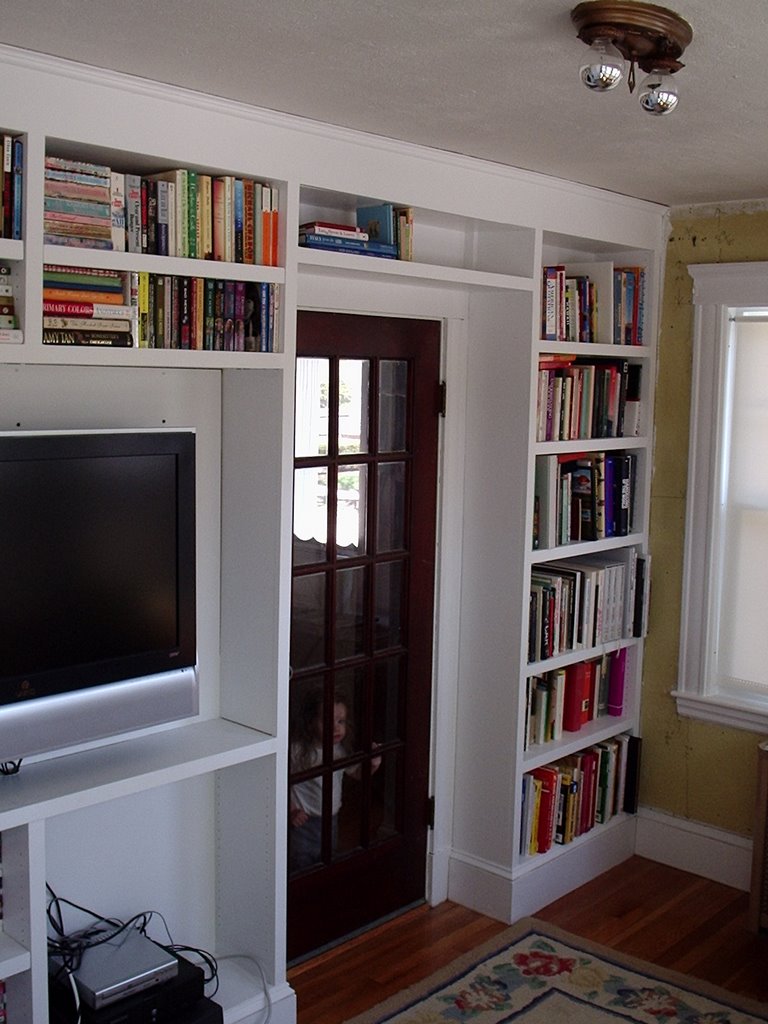
I didn't find any design I really liked until we happend to TiVo an episode of The New Yankee Workshop in which Norm Abrams builds some Georgian bookshelves. I reasoned that those bookshelves could be built and then joined with common crown molding and baseboards. So I copied the plans from watching the show (I ordered the blueprints but they never came).

I figured that I could buy a table saw, an air compressor, a nail gun, the materials, and a big LCD TV for less than half of what it would cost to hire a carpenter. And I would get a light coating of moisture-absorbent sawdust in my basement, which is nice.

We decided to build the units from 3/4" hardwood plywood, with solid poplar edging. We also decided to paint the shelves white, even though the wood on the shelves would have been beautiful stained. The shelves are in a sunroom, and all of the trim around the eight windows in that room is painted white. We also decided the make the backs of the shelves from solid wood rather than from beadboard. This give the shelves a pretty plain, simple look that matches the house's other detail.


First, we had to tear off all of the old paneling in the room. The plaster underneath had some holes, but we didn't care because it would be covered up. I built the shelves as independent units in the basement and then brought them upstairs to be joined. The exception to this was the center unit, which was too large to get through the door. 
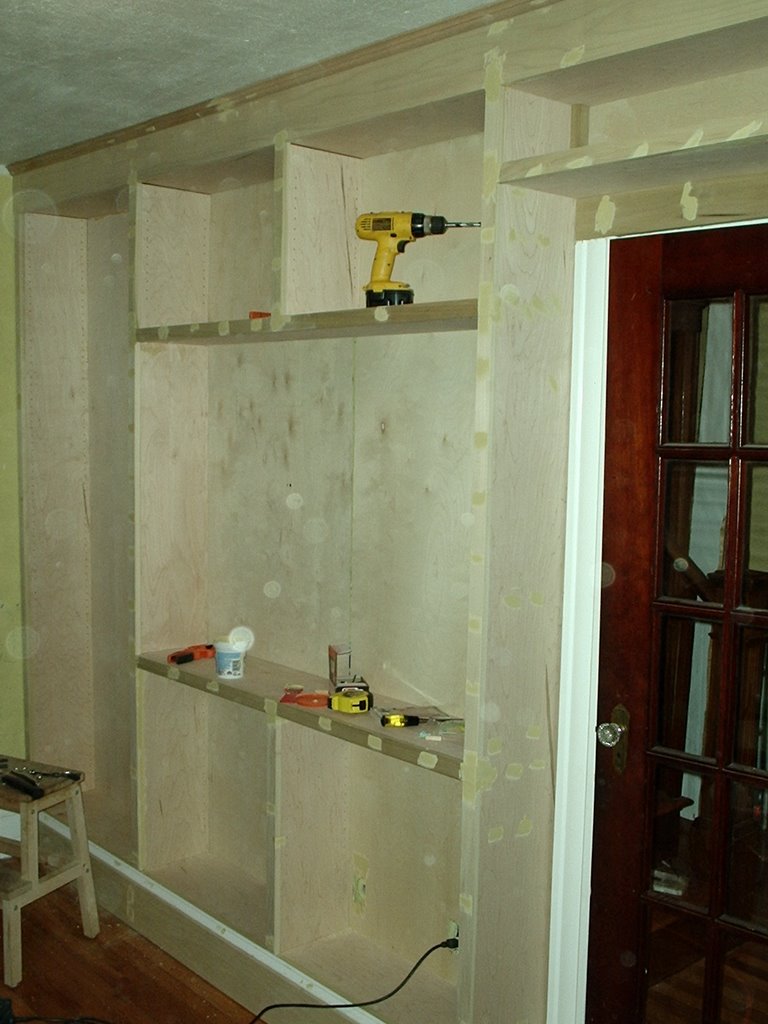
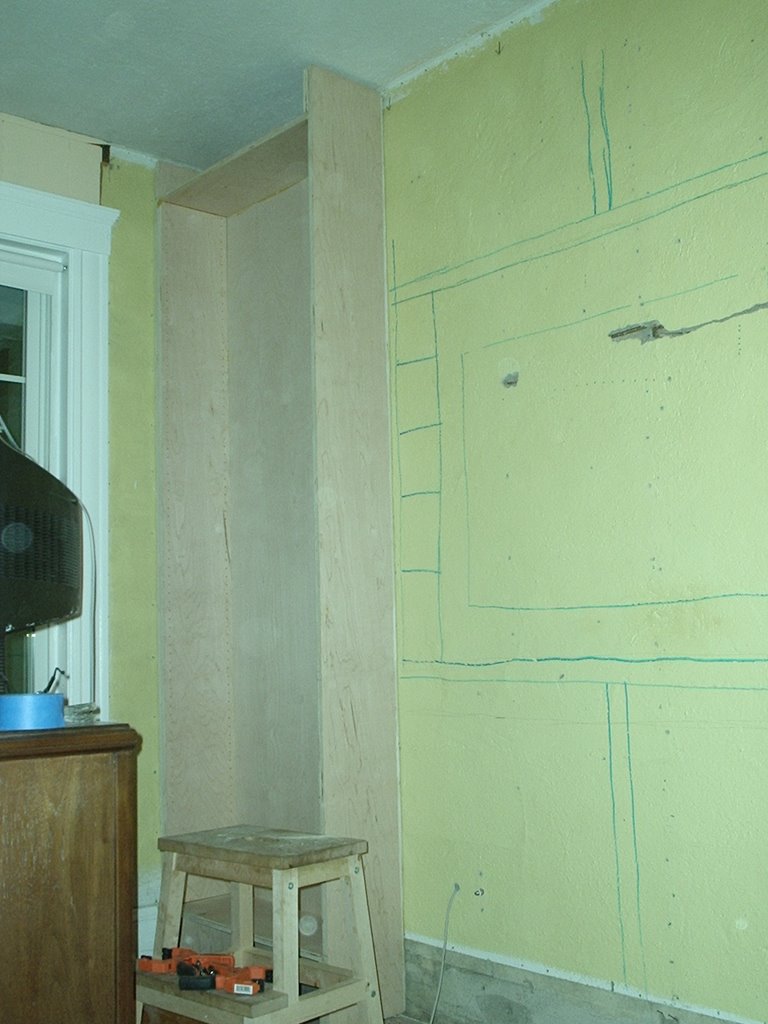
So I built that in the sunroom. The pillars of the bookshelves are 1.5" thick, or two pieces of 3/4" plywood sandwiched together. So where two units met, each of the units was only one piece of plywood thick. The shelves are about 10" deep. I drilled many little holes for shelf pegs using pegboard as a template. The underside of each shelf has four slots dadoed into it to accomodate the pegs and keep the shelves from sliding out. The poplar edging was nailed on using my pneumatic brad nailer, and then the hole was puttied over.


The crown molding and baseboards tie the whole thing together nicely. 
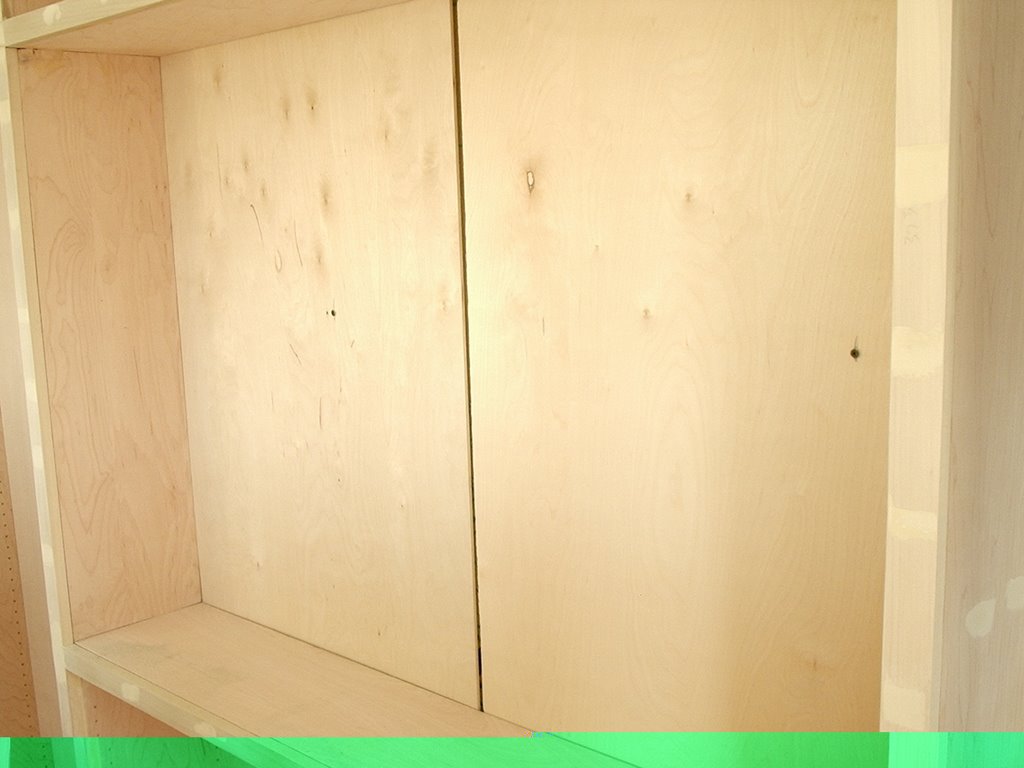
We found millwork to match our existing baseboards.

Becca and our good friend Heather primed and painted the whole thing over the course of two days. It is quite simple looking. 
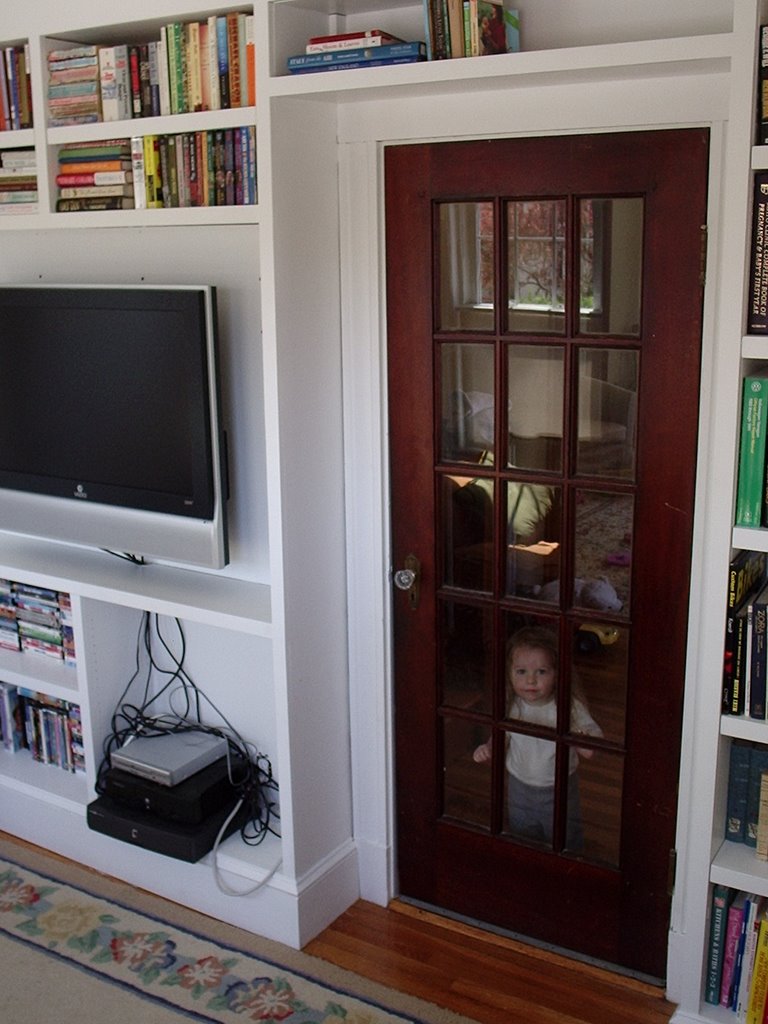
We were tempted to get fancy and put nice millwork on the edges, but the simple look really matches the house.

The place for the holy TV is reinforced to carry its weight. The wall behind the TV is 1.5" thick, and it the whole thing is screwed into studs behind the shelves. The TV is AWESOME. And because it is only 5" think, it doesn't intrude into the room the way the old TV did.