Short entry. We got an Apple TV to replace our DVD changer. Here is what I learned about ripping my DVDs (in Windows):
1) insert a DVD in your drive
2) copy your DVD onto your hard drive using DVDFab Decrypter
3) using the Apple TV presets, use Handbrake to make a movie file from the DVD file you just made. I usually use the Apple TV presets but click "Two-Pass Encoding" and "Turbo first pass". If the program has horizontal lines in it where there is motion, redo the file after checking "decomb" or "deinterlace"
4) Use MetaX to put nice tags on the movie file (Movie poster for the Apple TV display, ratings, synopsis, etc.)
5) Import the file into iTunes. I set up my iTunes library on a USB hard drive. This is cheap storage, and it means you don't have to use the Apple TV's hard drive.
6) When setting up the Apple TV, make sure to set it up to stream content out of iTunes rather than Sync with iTunes.
You're done!
Tuesday, December 30, 2008
Saturday, December 27, 2008
Gangsta Wrap
I'm not going to be able to do this project justice with the time I have tonight, but here it is in brief: I have been fascinated by DuPont Tyvek for some time now. I know that people make wallets and ground cloths (for camping) out of the stuff. Also, there are hazmat suits made from Tyvek. The cool thing about it to me is that it is like poor man's Gore-Tex. It is waterproof and breathable, and it costs about $50 for a 150-foot roll at Home Depot. As I understand it, Tyvek is difficult to sew, but special Tyvek tape can be used to tape Tyvek together and the resulting bond is as good as a sewn seam.
My favorite jacket, the one I commute on my bike in, is a vintage Marmot Gore-Tex shell. It is one layer of Gore and one layer of nylon. Basically like a heavy windbreaker. Somehow the air space between the Gore and the nylon allows me to bike in the jacket at any temperature between 15 and 50 degrees F. If I could find another Marmot EXACTLY like it, I'd drop $300 for it in a heartbeat.
So it occurred to me a while ago that I could replicate my favorite Marmot in Tyvek. For about $10, I got all of the hardware I needed at a sewing store: Zipper, Velcro, Elastic cord, Cord stops. I had a roll of Tyvek left over from doing our basement ceiling.
The order of battle (go slowly and think through this stuff before you do it. It is basically a 5-hour IQ test--it forces you to figure out what 3-dimensional shape will result from the joining of 2-dimensional panels, and then you have to invert shapes mentally):
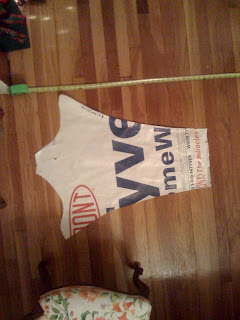
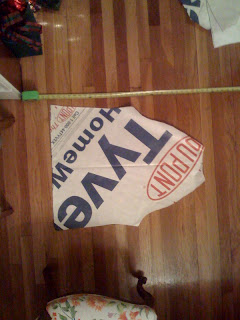
1) trace pieces from panels of coat, inside and outside, using a sharpie. Cut them out. (I purposefully left the DuPont Tyvek Homewrap logos on the outside).
2) tape up the liner, and tape up the shell. Use small pieces to go around corners. Only tape one side of the liner and shell (no tape against skin when wearing it, and no tape seams exposed on shell)
3) Turn liner inside out (tape next to skin)
4) Turn shell inside out (tape exposed)
5) Put on liner over shell.
6) Be really smart, think ahead, and tape the two together. Include zipper. Leave a gap so that the whole thing can be pulled inside out.
7) Reach into a gap (I left the bottom of the shell and the liner unattached--the waist part) and grab the inside of the hood and pull it so that the liner/shell turns inside out. It should now be right side out. Think of this as having a ziploc bag inside-out and then pulling it so that it is right-side out.
8) You probably forgot something, so be ready to go back and turn it inside out, or inverted, to tape whatever needs to be done.
9) The hood was the hardest part.
10) Don't panic if you messed up--you can always cut something out and then tape in a patch.
I went out to run the snowblower in 20 degree weather with the jacket on. In 2 hours outside, it was fantastic. The only problem was that the zipper came unstuck from the tape around my mouth. I think it is an area of high stress, and the condensation from my breath didn't help. I will probably go back and sew the zipper to the Tyvek tape and then tape over the stitching. I also am planning to throw the jacket in hot dryer for ten minutes in order to get the adhesive in the tape to really fuse to the fabric. The Tyvek starts out feeling like very stiff paper or sail cloth. After the construction process and a few wearings, it has softened up. If I had to do it over (which I may at some point for fun), I would make it a little larger. I think the stiffness of the Tyvek makes the coat feel tighter than the Marmot equivalent.
Also, nb, the photos of the parts below are all taken from a specific height. You could probably blow up the photos to make patterns if you were really excited about doing it. Also, nb, this will be a high-visibility coat for biking, but it blends in with snow like nobody's business. Be careful.
 Sleeves:
 Hood parts:

 Back panels:
 Hood parts:
 Chest panels:
 Sleeves:

 Taped up liner sleeve:
 Liner back and chest panels taped together:
 Liner sleeve joined to torso (back and chest) panels:
 Hoodless liner and shell:

 Wearing liner inside out (tape side in):
 Shell over liner:
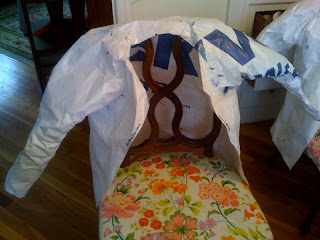
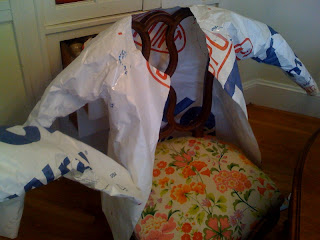
 The whole shooting match (getting ready to go out to shovel):

My favorite jacket, the one I commute on my bike in, is a vintage Marmot Gore-Tex shell. It is one layer of Gore and one layer of nylon. Basically like a heavy windbreaker. Somehow the air space between the Gore and the nylon allows me to bike in the jacket at any temperature between 15 and 50 degrees F. If I could find another Marmot EXACTLY like it, I'd drop $300 for it in a heartbeat.
So it occurred to me a while ago that I could replicate my favorite Marmot in Tyvek. For about $10, I got all of the hardware I needed at a sewing store: Zipper, Velcro, Elastic cord, Cord stops. I had a roll of Tyvek left over from doing our basement ceiling.
The order of battle (go slowly and think through this stuff before you do it. It is basically a 5-hour IQ test--it forces you to figure out what 3-dimensional shape will result from the joining of 2-dimensional panels, and then you have to invert shapes mentally):
1) trace pieces from panels of coat, inside and outside, using a sharpie. Cut them out. (I purposefully left the DuPont Tyvek Homewrap logos on the outside).
2) tape up the liner, and tape up the shell. Use small pieces to go around corners. Only tape one side of the liner and shell (no tape against skin when wearing it, and no tape seams exposed on shell)
3) Turn liner inside out (tape next to skin)
4) Turn shell inside out (tape exposed)
5) Put on liner over shell.
6) Be really smart, think ahead, and tape the two together. Include zipper. Leave a gap so that the whole thing can be pulled inside out.
7) Reach into a gap (I left the bottom of the shell and the liner unattached--the waist part) and grab the inside of the hood and pull it so that the liner/shell turns inside out. It should now be right side out. Think of this as having a ziploc bag inside-out and then pulling it so that it is right-side out.
8) You probably forgot something, so be ready to go back and turn it inside out, or inverted, to tape whatever needs to be done.
9) The hood was the hardest part.
10) Don't panic if you messed up--you can always cut something out and then tape in a patch.
I went out to run the snowblower in 20 degree weather with the jacket on. In 2 hours outside, it was fantastic. The only problem was that the zipper came unstuck from the tape around my mouth. I think it is an area of high stress, and the condensation from my breath didn't help. I will probably go back and sew the zipper to the Tyvek tape and then tape over the stitching. I also am planning to throw the jacket in hot dryer for ten minutes in order to get the adhesive in the tape to really fuse to the fabric. The Tyvek starts out feeling like very stiff paper or sail cloth. After the construction process and a few wearings, it has softened up. If I had to do it over (which I may at some point for fun), I would make it a little larger. I think the stiffness of the Tyvek makes the coat feel tighter than the Marmot equivalent.
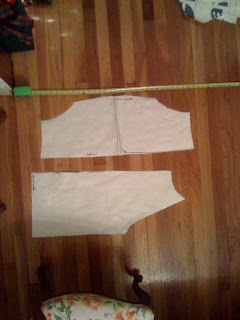
Also, nb, the photos of the parts below are all taken from a specific height. You could probably blow up the photos to make patterns if you were really excited about doing it. Also, nb, this will be a high-visibility coat for biking, but it blends in with snow like nobody's business. Be careful.
The pile of panels:
 Sleeves:
 Hood parts:

 Back panels:
 Hood parts:
 Chest panels:
 Sleeves:
 Taped up liner sleeve:
 Liner back and chest panels taped together:
 Liner sleeve joined to torso (back and chest) panels:
 Hoodless liner and shell:


 Wearing liner inside out (tape side in):
 Shell over liner:
 The whole shooting match (getting ready to go out to shovel):

Tuesday, November 18, 2008
Rack It!
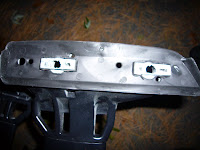
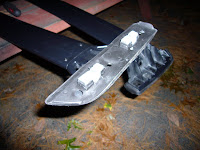
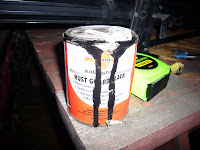
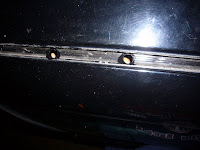
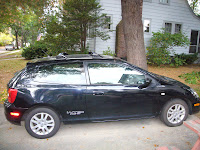
The Civic needed a rack, and I didn't like the Yakima/Thule ones out there. They look too "added-on" to me. The Civic Si has nice rain gutters. So I started looking around at other cars with OEM racks and similarly-shaped rain gutters. The Acura MDX suv has a very similar shape, and it's made by Honda, too. I bought a set on eBay and cut them down to the width of the Civic's roof. I drilled holes of a large enough diameter to put blind nuts called "Plusnuts" into the roof. I primed the bare metal exposed by the drilling with POR-15 so that it wouldn't rust. Then I gooped tons of silicone sealant in the holes. The racks required some pretty serious angle grinding to get them to fit down in the gutters, but they look totally stock now.


Tuesday, October 07, 2008
Shifty Character
I will probably edit this later, but right now I am going to post something rough so that I can get help from the Internet community. In a previous post, I described my ultimate commuter bike. Here it is with its new 700c Reynolds Ouzo Carbon Fork. (Brakes and tires are being updated as part of this change):

I LOVE the Shimano Nexus 8 Premium (red band) hub on the bike. Unfortunately, Shimano does not offer a shifter for this hub that fits on road bike handlebars. As a result, I am stuck with mountain bike handlebars. (I actually cornered a Shimano engineer at Interbike to talk with him about this. Another guy was doing the same thing as I walked up to him. So this seems to be something people want.) I go back and forth on whether I actually need a road bar, but I feel it is a technical challenge to figure out a way to adapt another shifter to work with the Nexus (and Alfine eventually). The challenges are:
1) The Nexus requires a cable pull between shifts that is different from any other shifter out there except for the Nexus-specific shifter.
2) Internal hubs need to have the cable very precisely controlled or the mechanisms will wear quickly.
So in order to figure out just how much cable the Nexus shifter pulls I used a Sharpie to put a dot on the exposed part of the cable next to the shifter as a reference. I measured the full travel of the dot from 1st to 8th gear. Here is a table with what I measured:
I believe that there is supposed to be uniform spacing between gears, which means that my shifter is not the most precise instrument in the world, at least on its location of 5th gear. I imagine that somewhere at a Shimano plant the plastic castings have the detent hole for 5th gear just slightly off. Or I have a piece of sand in mine. This non-uniform gear spacing might explain the little noises I heard that led me a few months ago to tear down the whole hub in a fit of mechanical paranoia. I did not find the metal shavings I had imagined were in there. It looked beautiful. But that is a post for another time. Based on these measurements, I feel pretty comfortable saying that increments between gears is 5.2 mm. Now we have something to work with.
So, what is the cable pull for shifters out there. Taking information found around the web (specifically this very good article on Shimergo (combination of Shimano and Campagnolo components), I found these cable pull figures:
So, what to do?
A really cool place called Jtek engineering makes a device called a ShiftMate, which seems to be a pulley that alters the pull ratios by using two different sized diameters on one pulley wheel. Using the information on Jtek's website about where their product fits, along with information about the sprocket pitches of common sprockets, I think I can calculate the ratio changes that the different ShiftMate wheels are capable of. First, sprocket pitches from around the web:
And now put it together with the Jtek information in a spreadsheet and solve for the ratios that Jtek must be using. I should point out that this Jtek device is very clever. At first I thought I was making a mistake because the ratios I solved for were either 1+ a little bit or 1- a little bit. But it looks as though you can set up the shifter to pull on the small diameter of the wheel or on the large diameter of the wheel (placing the "output" cable to the derailleur on the pulley diameter that the shifter cable is NOT on). So this makes sense. Each wheel is capable of doing one ratio or the inverse of that ratio. (PLEASE NOTE THAT THESE ARE NOT OFFICIAL FIGURES FROM JTEK. I AM CERTAIN THAT I HAVE SOME ERRORS IN MY CALCULATIONS. YOU SHOULD CONTACT THE COMPANY TO GET THE RIGHT FIGURES) Anyway, here they are. Very cool:
So, the question now is what to do with this information. I need at least an 8-, 9-, or 10-speed shifter. If I bounce the Jtek products (including their inverse ratios) against all of the shifters in my table, I find a few possible solutions:
In particular, it looks like the Jtek 3 and 4 could make SRAM shifters work. More later.

I LOVE the Shimano Nexus 8 Premium (red band) hub on the bike. Unfortunately, Shimano does not offer a shifter for this hub that fits on road bike handlebars. As a result, I am stuck with mountain bike handlebars. (I actually cornered a Shimano engineer at Interbike to talk with him about this. Another guy was doing the same thing as I walked up to him. So this seems to be something people want.) I go back and forth on whether I actually need a road bar, but I feel it is a technical challenge to figure out a way to adapt another shifter to work with the Nexus (and Alfine eventually). The challenges are:
1) The Nexus requires a cable pull between shifts that is different from any other shifter out there except for the Nexus-specific shifter.
2) Internal hubs need to have the cable very precisely controlled or the mechanisms will wear quickly.
So in order to figure out just how much cable the Nexus shifter pulls I used a Sharpie to put a dot on the exposed part of the cable next to the shifter as a reference. I measured the full travel of the dot from 1st to 8th gear. Here is a table with what I measured:
| inches | mm | actual step mm | |
| 0.124 | 3.1496 | | gear change |
| 0.327 | 8.3058 | 5.1562 | 1-2 |
| 0.528 | 13.4112 | 5.1054 | 2-3 |
| 0.732 | 18.5928 | 5.1816 | 3-4 |
| 0.990 | 25.1460 | 6.5532 | 4-5 |
| 1.149 | 29.1846 | 4.0386 | 5-6 |
| 1.350 | 34.2900 | 5.1054 | 6-7 |
| 1.555 | 39.4970 | 5.2070 | 7-8 |
| | | 5.1925 | avg |
I believe that there is supposed to be uniform spacing between gears, which means that my shifter is not the most precise instrument in the world, at least on its location of 5th gear. I imagine that somewhere at a Shimano plant the plastic castings have the detent hole for 5th gear just slightly off. Or I have a piece of sand in mine. This non-uniform gear spacing might explain the little noises I heard that led me a few months ago to tear down the whole hub in a fit of mechanical paranoia. I did not find the metal shavings I had imagined were in there. It looked beautiful. But that is a post for another time. Based on these measurements, I feel pretty comfortable saying that increments between gears is 5.2 mm. Now we have something to work with.
So, what is the cable pull for shifters out there. Taking information found around the web (specifically this very good article on Shimergo (combination of Shimano and Campagnolo components), I found these cable pull figures:
| | Cable Pull |
| Shifter | (mm) |
| Shimano 6 | 3.2 |
| Shimano 7 | 2.9 |
| Shimano 8 | 2.8 |
| Shimano 9 | 2.5 |
| Shimano 10 | 2.3 |
| Campag 8 | 3.5 |
| Campag old 9 | 3.2 |
| Campag new 9 | 3.0 |
| Campag 10 | 2.8 |
| Sram (1.0) 7 | 4.5 |
| Sram (1.0) 8 | 4.3 |
| Sram (1.0) 9 | 4.0 |
| Shimano Revo Nexus 8 (mine) | 5.2 |
So, what to do?
A really cool place called Jtek engineering makes a device called a ShiftMate, which seems to be a pulley that alters the pull ratios by using two different sized diameters on one pulley wheel. Using the information on Jtek's website about where their product fits, along with information about the sprocket pitches of common sprockets, I think I can calculate the ratio changes that the different ShiftMate wheels are capable of. First, sprocket pitches from around the web:
| Cassette or Freewheel | Sprocket Pitch | Code |
| | (mm) | |
| All modern 5 and 6-speed | 5.5 | S5/6 |
| All standard 7-speed | 5 | S7 |
| Campagnolo 8-speed | 5 | C8 |
| Shimano 8-speed | 4.8 | S8 |
| Campagnolo 9-speed | 4.55 | C9 |
| Shimano 9-speed | 4.35 | S9 |
| Campagnolo 10-speed | 4.15 | C10 |
| Shimano 10-speed | 3.95 | S10 |
And now put it together with the Jtek information in a spreadsheet and solve for the ratios that Jtek must be using. I should point out that this Jtek device is very clever. At first I thought I was making a mistake because the ratios I solved for were either 1+ a little bit or 1- a little bit. But it looks as though you can set up the shifter to pull on the small diameter of the wheel or on the large diameter of the wheel (placing the "output" cable to the derailleur on the pulley diameter that the shifter cable is NOT on). So this makes sense. Each wheel is capable of doing one ratio or the inverse of that ratio. (PLEASE NOTE THAT THESE ARE NOT OFFICIAL FIGURES FROM JTEK. I AM CERTAIN THAT I HAVE SOME ERRORS IN MY CALCULATIONS. YOU SHOULD CONTACT THE COMPANY TO GET THE RIGHT FIGURES) Anyway, here they are. Very cool:
| JTEK Product | | | | | | | | | |
| #1 | shifter | pull mm | der | shift ratio | cass | sprock pitch | calc pitch | pitch diff | implied jtek ratio |
| | S8 | 2.8 | S | 1.7 | C8 | 5.00 | 5.00 | 0 | 1.050 |
| | S9 | 2.5 | S | 1.7 | C9 | 4.55 | 4.55 | 0 | 1.071 |
| | S10 | 2.3 | S | 1.7 | C10 | 4.15 | 4.15 | 0 | 1.061 |
| | C8 | 3.5 | C | 1.4 | S8 | 4.80 | 4.80 | 0 | 0.980 |
| | C9 old | 3.2 | C | 1.4 | S9 | 4.35 | 4.35 | 0 | 0.971 |
| | C10 | 2.8 | C | 1.5 | S10 | 3.95 | 3.95 | 0 | 0.940 |
| | C10 | 2.8 | C | 1.5 | S9 | 4.35 | 4.35 | 0 | 1.036 |
| | | | | | | | | | |
| #2 | S9 | 2.5 | S | 1.7 | S8 | 4.80 | 4.80 | 0 | 1.129 |
| | S9 | 2.5 | C | 1.5 | C10 | 4.15 | 4.15 | 0 | 1.107 |
| | S9 | 2.5 | S | 1.7 | S10 | 3.95 | 3.95 | 0 | 0.929 |
| | S10 | 2.3 | S | 1.7 | S9 | 4.35 | 4.35 | 0 | 1.113 |
| | C9 | 3.0 | S | 1.7 | S8 | 4.80 | 4.80 | 0 | 0.941 |
| | C9 | 3.0 | C | 1.5 | C10 | 4.15 | 4.15 | 0 | 0.922 |
| | C9 | 3.0 | S | 1.7 | S9 | 4.35 | 4.35 | 0 | 0.853 |
| | C10 | 2.8 | C | 1.5 | C9 | 4.55 | 4.55 | 0 | 1.083 |
| | | | | | | | | | |
| #3 | S9 | 2.5 | C | 1.5 | C9 | 4.55 | 4.55 | 0 | 1.213 |
| | S10 | 2.3 | C | 1.5 | C10 | 4.15 | 4.15 | 0 | 1.203 |
| | C9 | 3.0 | S | 1.7 | S9 | 4.35 | 4.35 | 0 | 0.853 |
| | C10 | 2.8 | S | 1.7 | S10 | 3.95 | 3.95 | 0 | 0.830 |
| | | | | | | | | | |
| #4 | S8 | 2.8 | C | 1.4 | C8 | 5.00 | 5.00 | 0 | 1.276 |
| | S9 | 2.5 | C | 1.4 | C9 | 4.55 | 4.55 | 0 | 1.300 |
| | C8 | 3.5 | S | 1.7 | S8 | 4.80 | 4.80 | 0 | 0.807 |
| | C9 | 3.2 | S | 1.7 | S9 | 4.35 | 4.35 | 0 | 0.800 |
So, the question now is what to do with this information. I need at least an 8-, 9-, or 10-speed shifter. If I bounce the Jtek products (including their inverse ratios) against all of the shifters in my table, I find a few possible solutions:
| | | jtek (i is inverted) | |||||||
| | Cable Pull | 1 | 2 | 3 | 4 | 1i | 2i | 3i | 4i |
| Shifter | (mm) | 1.05 | 1.10 | 1.20 | 1.30 | 0.95 | 0.91 | 0.83 | 0.77 |
| Shimano 6 | 3.2 | 3.36 | 3.52 | 3.84 | 4.16 | 3.05 | 2.91 | 2.67 | 2.46 |
| Shimano 7 | 2.9 | 3.05 | 3.19 | 3.48 | 3.77 | 2.76 | 2.64 | 2.42 | 2.23 |
| Shimano 8 | 2.8 | 2.94 | 3.08 | 3.36 | 3.64 | 2.67 | 2.55 | 2.33 | 2.15 |
| Shimano 9 | 2.5 | 2.63 | 2.75 | 3.00 | 3.25 | 2.38 | 2.27 | 2.08 | 1.92 |
| Shimano 10 | 2.3 | 2.42 | 2.53 | 2.76 | 2.99 | 2.19 | 2.09 | 1.92 | 1.77 |
| Campag 8 | 3.5 | 3.68 | 3.85 | 4.20 | 4.55 | 3.33 | 3.18 | 2.92 | 2.69 |
| Campag old 9 | 3.2 | 3.36 | 3.52 | 3.84 | 4.16 | 3.05 | 2.91 | 2.67 | 2.46 |
| Campag new 9 | 3.0 | 3.15 | 3.30 | 3.60 | 3.90 | 2.86 | 2.73 | 2.50 | 2.31 |
| Campag 10 | 2.8 | 2.94 | 3.08 | 3.36 | 3.64 | 2.67 | 2.55 | 2.33 | 2.15 |
| Sram (1.0) 7 | 4.5 | 4.73 | 4.95 | 5.40 | 5.85 | 4.29 | 4.09 | 3.75 | 3.46 |
| Sram (1.0) 8 | 4.3 | 4.52 | 4.73 | 5.16 | 5.59 | 4.10 | 3.91 | 3.58 | 3.31 |
| Sram (1.0) 9 | 4.0 | 4.20 | 4.40 | 4.80 | 5.20 | 3.81 | 3.64 | 3.33 | 3.08 |
In particular, it looks like the Jtek 3 and 4 could make SRAM shifters work. More later.
Subscribe to:
Posts (Atom)